Install ScanSnap s1300, s1300i, s1100 and s300 drivers on Linux - drivers included

The Fujitsu ScanSnap s1300, s1100 and s300 were some of the best low cost duplex scanners available, and if you've got one no doubt it's still going strong. Likewise, the current generation s1300i upholds that tradition and is arguably one of the best scanners currently on sale.
Unfortunately Fujitsu don't provide linux drivers so this post provides those drivers for you to download.
This post looks long but it's just spelt out very very clearly. The actual number of things you need to do is not that high at all. I've seen many terse instructions that fail to give new users enough to go on so this one is written out fully and clearly.
To that end I'll also walk you through the install process so you can have your s1300, s1300i, s1100 and s300 happily scanning away just like they would if you were using Windows or OS X/macOS.
Well, almost, there are certain bits that don't work like one button scanning but it's not too much of a hardship.
ScanSnap s1300, s1100, s1300i and s300 driver download
Here they are then, just one file for each driver to download:
Download 1300_0C26.nal driver for Fujitsu ScanSnap s1300
Download 300_0C00.nal driver for Fujitsu ScanSnap s300
Download 1100_0A00.nal driver for Fujitsu ScanSnap s1100
Download 1300i_0D12.nal driver for Fujitsu ScanSnap s1300i
If you know what you're doing, or if you're me returning because I've reinstalled our system yet again (stop doing that!!) then carry on and ignore the rest.
If you aren't sure what you're doing then click the link above to download the driver (put it in your downloads folder or remember where you put it) and read on for instructions on how to install the relevant one.
Installing ScanSnap s1300, s1300i, s1100 or s300 driver on Ubuntu
First things first there's no point telling you how to install each driver itself, because it's basically the same way for each. Instead I'll show you how to install the s1300 and those steps can be used to install drivers for the s1100, s1300i and s300.
One other thing - this post requires you to use the terminal. If you aren't familiar with it then here's a great post on getting started with the terminal by How-To Geek. Try not to be put off if you are new to the terminal, all it requires is that you can type text, that's literally it.
I run vanilla Ubuntu 16.04 LTS, but I did test this driver install on Linux Mint 18 and Debian Jessie 8.5 and this process worked. It should work on any Debian based distro (that includes Ubuntu based ones and it's offspring for those that aren't familiar with the mess that is Linux distributions).
I've not tested it on a non-Debian based distro simply because I don't run them but I do believe it works. If you try this on Fedora, Arch, Slackware, Gentoo etc etc and it works please report on your success or failure in the comments so I can make adjustments to this post.
Install SANE
First thing is to install SANE and associated utilities. Open a terminal and type the following to install SANE:
sudo apt-get install sane sane-utils libsane-extras
You'll probably be asked to enter your password to allow the install to proceed.
The result will be something like below if you're running an Ubuntu based Distro but a pure Debian variant will likely perform an install as it's not usually already installed on Debain.

NOTE - In Ubuntu 17.10 you may also be prompted to install the GIMP package as part of the SANE installation. Go ahead and install it. You may also be prompted to install libsane-extras-common instead of libsane-extras. That's fine too, just install that package - sometimes names change.
Find your s1300, s1300i, s1100 or s300 Scanner
Now we need to make sure the system can find your scanner. Make sure it's connected and powered on by plugging in the power cable and connecting it to a USB port on your computer. You make sure it is on by opening the lid/paper tray which will cause the scan button to flash blue.
Once that's done, use the following command to have SANE look for the scanner:
sudo sane-find-scanner
You'll get a rush of text that'll look something like below. I've highlighted the important bit in the red box...

Don't worry about the errors, just look for something similar to that output in the red box and that shows it's properly detected the scanner. For those reading this with a screen reader, the relevant output I got is:
found USB scanner (vendor=0x04c5 [FUJITSU], product=0x11ed [ScanSnap S1300]) at libusb:003:010
You should find something similar in your terminal output.
Installing the s1300, s1300i, s1100 or s300 drivers themselves
So now we get to installing the driver you need. If you have the s1300 you obviously don't need to install the s300 driver too, just install the relevant one for your scanner.
Step 1 - create relevant folders
Create a folder called ‘epjitsu’ in the directory /usr/share/sane using the following command:
sudo mkdir /usr/share/sane/epjitsu
Step 2 - move the drivers
Move the drivers (that's all you need to do to 'install' them) to the usr/share/sane/epjitsu folder you just created.
NOTE - You need to know where exactly you downloaded the drivers. Most of the time they automatically go into your Downloads folder so the commands below will work fine. If not, you'll need to find the correct path to the downloaded files (if you saved them to your Desktop or something) and use that path instead.
If you didn't download the driver you need yet, scroll back up and grab it.
I'm going to assume you put the file in the Downloads folder inside your 'Home' directory.
So for the S1300 type:
cd ~
That'll make sure you're in you Home directory. Then:
sudo cp Downloads/1300_0C26.nal /usr/share/sane/epjitsu/1300_0C26.nal
For the S300 insert:
cd ~
Then:
sudo cp Downloads/300_0C00.nal /usr/share/sane/epjitsu/300_0C00.nal
I'm sure you can work out for yourself how to do the s300 and s1300i - just change the names in the command.
NOTE - That like ~ symbol is the tilde key, it's normally on the top left or bottom left of the keyboard and might need the shift key to get to it. Or you could just copy and paste what I've put here but the standard warning is your should never just copy and paste commands from someone on the internet, even the nice people!
Step 3 - update configuration settings
That might sound a bit off putting if you're new, don't worry, it's just text and we make the adjustment using a text editor.
Use the following command to open the config file in gedit. gedit is just a plain text editor that is normally installed by default so that's why I chose it, feel free to use the editor of your choice if you wish but don't use anything like LibreOffice as we need a plain text editor, not one that adds it's own invisible markup:
sudo gedit /etc/sane.d/epjitsu.conf
gedit will open and you'll see a wall of text in the programme like below. I've highlighted the sections you need to look for in the red boxes.
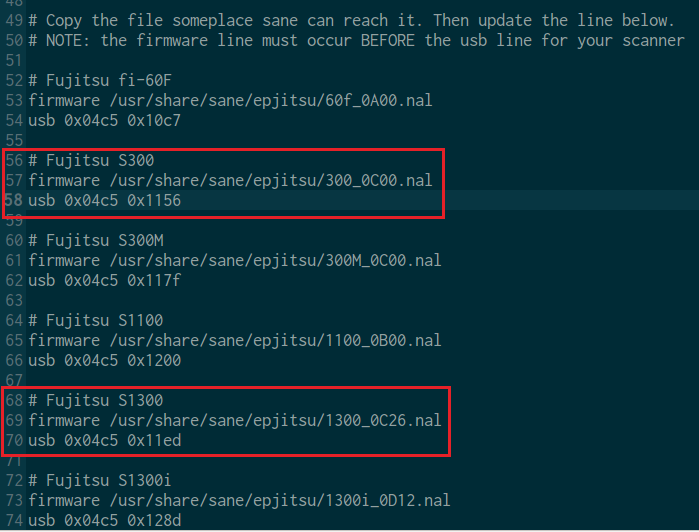
Scroll to the bottom and look for those lines:
# Fujitsu S1300
firmware /usr/share/sane/epjitsu/1300_0C26.nal
usb 0x04c5 0x11ed
or...
# Fujitsu S300
firmware /usr/share/sane/epjitsu/300_0C00.nal
usb 0x04c5 0x1156
...or the lines that match for the s1300i/s1100.
If those lines aren't there or they are wrong, add or adjust them as needed.
Interestingly, you'll see the s300 driver will work for the s300M but the s1300 driver won't work for the s1300i, so make sure you use the correct driver for your device.
Step 4 - reboot you computer
Go ahead and reboot your computer now. Once you've done that, log back in and return here to follow the next steps
Step 5 - Checking it worked
Open a terminal and enter:
scanimage -L
Nothing will happen for a few seconds, that's normal. After a short time you should hear the scanner spool up and the light will turn solid blue. Once that's happened the terminal should return something like:
device 'epjitsu:libusb:003:008' is a FUJITSU ScanSnap S1300 scanner
Here's what is looked like for me...

Now open up your scanner application, Ubuntu uses Simple Scan by default. You can find it by clicking the Dash button (top of the launcher bar) and simply typing 'Simple Scan', then hitting the enter key.
Once open, place something that you want to scan into the paper tray and press ‘Scan’ in the software application. It's the button on the top menu bar, you can't miss it!
You should see something like the image below...
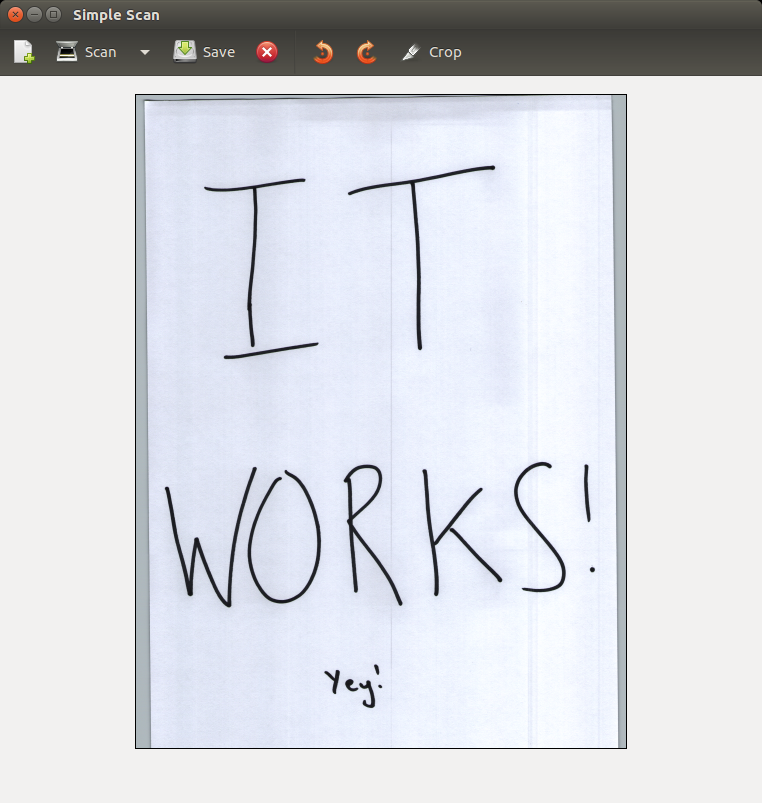
Your Fujitsu Scansnap S1300/S300 is now working. Yey!
Problems, problems, problems...
A couple problems for me:
1) The hardware scan-button does not work, pressing it does nothing.
2) Simple Scan only does a single side scan.
If you need duplex scanning, try gscan2pdf. You can search for it and install it on the Ubuntu software centre or in the Debian repos. Other distros probably have it in their repos too.
Using gscan2pdf offers way more control and I get perfect duplex (double sided) scanning every time.
3) Can't find a scanner unless you use sudo
If this happens, you might need to just update the permissions on the scanners' group. Have a look at this post for info on how to do that.
Final words
I hope this works for you. It may not, every system is different.
If you run into a problem make sure you recheck all the steps, try rebooting the computer again and try reconnecting the scanner. Even try a different USB cable or USB port - they've been known to fail.
I can't promise to help much but if you post in the comments here I'll do my best. I'm sure over time others will turn up here too and help out.